Archivi categoria: Arduino

FreePachube finito! Savara 4.0!

Finalmente ho finito il sito che tempo fa avevo accennato in questo blog.
L’ho ribattezzato Savara, acronimo di: Simple Arduino Viewing of Arranged ReAdings….

Freepachube era troppo scontato e brutto… la mia idea era quella di clonare pachube.com e thingspeak.com.
Ho usato asp.net 4.0 e C# e ho ottenuto questo dopo un pò di test:


capture


Non sarà il massimo ma sono contentissimo del risultato, l’intero progetto è scaricabile qui: scaricami

Installare/ripristinare Optiboot su Arduino Duemilanove

Oggi avevo taaaaaanta voglia di installare il “nuovo” bootloader OptiBoot 4.4  sulla mia duemilanove… risultato: brickata e poi debrickata (dubbi??).
Ora cercherò di spiegarvi come installare l’ultima versione del’optiboot sul vostro microcontroller.
Ma cos’ha di così tanto speciale l’OptiBoot?
Prima di tutto OptiBoot è il bootloader nuovo utilizzato dalle Arduino UNO in poi, il link del progetto ufficiale è questo: https://code.google.com/p/optiboot/
Dalla home del progetto leggiamo:

  • Possibilità di scrivere sketch più grandi. Optiboot è grande 0.5k (un quarto più più piccolo rispetto al bootloader del duemilanove) significa che guadagnamo 1.5k di spazio per il codice. Per un totale di 32256 byte
  • Upload degli sketch molto più veloce. Velocità di upload 115200baud
  • Permette di far girare prima i propri sketch senza watchdog.

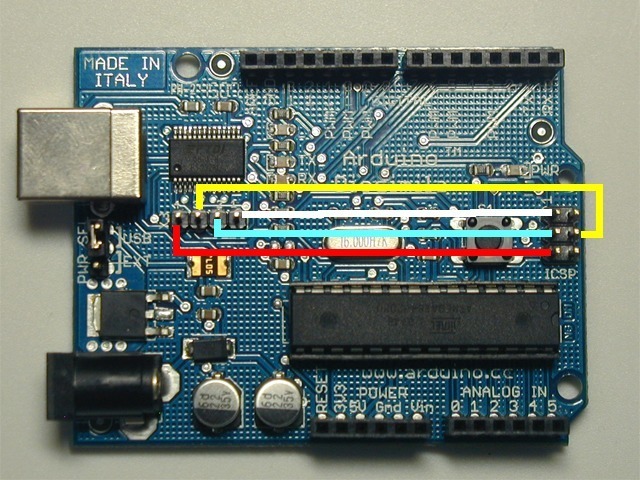
0. Prima di tutto dobbiamo fare dei collegamenti tra l’FTDI e l’interfaccia ICSP della nostra scheda:

2754610263_7d147df701_o

1. Ciò di cui abbiamo bisogno è l’ultima versione dell’optiboot scaricabile dal sito ufficiale, in particole questo file presente nel file zip: optiboot_atmega328.hex

  • In alternativa, se si vuole ripristinare il vecchio bootloader arduino duemilanove, esso è presente all’interno della cartella: arduino-0023hardwarearduinobootloadersatmegaATmegaBOOT_168_atmega328.hex

2. Ora scarichiamo e unzippiamo il package che ho preparato, da qui:     SCARICAMIII

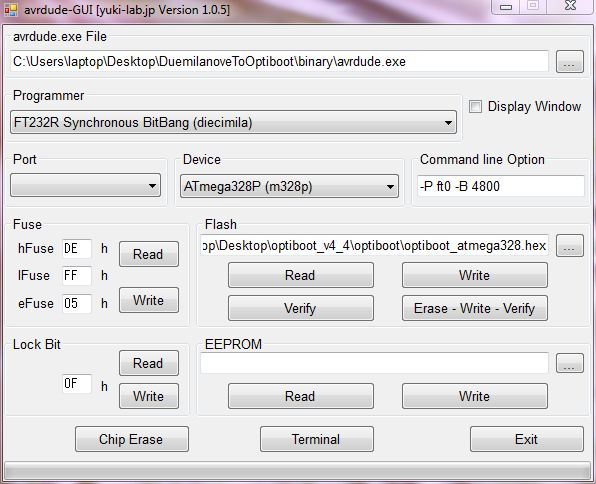
3. Apriamo avrdude-gui.exe

3. Selezionare avrdude.exe presente nella directory appena unzippataa

4. Come programmer impostiamo: FT232R Synchronous BitBang (diecimila)

5. Device: ATmega328P

6. Command option: -P ft0 -B 4800

7. Impostare i fuse in questo modo:

  • High Fuse: 0xDE per l’OptiBoot 0xDA per la versione vecchia del bootloader duemilanove
  • Low Fuse: 0xFF
  • Extended Fuse: 0x05
  • Lock Bit: 0x0F

Se avete dubbi, potete prendere questi valori direttamente dal’ultima versione dell’IDE e precisamente nel file: arduino-0023hardwareboards.txt

8. Selezioniamo dalla casella Flash l’OptiBoot scaricato e unzippato che desideriamo installare, precisamente: optiboot_atmega328.hex

Dovreste avere una cosa del genere:

catturanh

9. Collegare il cavo USB al pc: led POWER si accende

10. Ora cliccate su “Erase – Write – Verify”

11. Aspettate un pò di tempo: circa 10 minuti.

Ora che è andato tutto a buon fine, provate ad uploaddare lo sketch “blink” nel folder degli esempi, se avete messo l’optiboot ricordandovi di impostare come target board la board UNO.

Se blinka…. avete l’ultima versione dell’optiboot sulla vostra arduino duemilanove!

Se mettete l’optiboot sulla duemilanove ricordate di cambiare le impostazioni dell’ide: ora come target board dovete mettere “Arduino UNO” e NON più duemilanove. OK???

Fonti:
https://dereenigne.org/electronics/arduino/arduino-duemilanove-optiboot
https://www.geocities.jp/arduino_diecimila/bootloader/index_en.html

PS

Declino ogni responsibilità su probabilissimi brick delle vostre schede.

Aggiornamento:

questa è la mia guida che vi permette di aggiornare il vostro Arduino Duemilanove con l’IDE ufficiale utilizzando usbasp: https://www.blackstufflabs.com/2012/02/28/optiboot-4-4-su-arduino-nano

Stringa connessione DB per hosting 7hostfree.com

Stringa di connessione ad un db Access 2002-2003 .mdb con hosting gratuito 7host.com

Path: ./App_Data/mydb.mdb

|DataDirectory| = App_Data


<?xml version=”1.0″?>
<!–
Per ulteriori informazioni su come configurare l’applicazione ASP.NET, visitare il sito Web all’indirizzo
https://go.microsoft.com/fwlink/?LinkId=169433
–>
<configuration>
<connectionStrings>
<add name=”database” connectionString=”Provider=Microsoft.Jet.OleDb.4.0;Data Source=|DataDirectory|mydb.mdb;Persist Security Info=True”/>
</connectionStrings>
<system.web>
<customErrors mode=”Off”/>
<globalization culture=”IT-it” uiCulture=”IT-it”/>
</system.web>
</configuration>

Inviare dati da Arduino ad una pagina web asp.net 4 / C#

Finalmente oggi ci sono riuscito!
Sono riuscito ad inviare dati da arduino ad una pagina web da me creata.

Vediamo come

Pagina web:
acquire.aspx.cs

using System;
using System.Collections.Generic;
//using System.Linq;
using System.Web;
using System.Web.UI;
using System.Web.UI.WebControls;

public partial class acquire : System.Web.UI.Page
{
    protected void Page_Load(object sender, EventArgs e)
    {
        TextBox1.Text = Request.QueryString["username"];
        TextBox2.Text = Request.QueryString["password"];
        TextBox3.Text = Request.QueryString["datastream"];
        TextBox4.Text = Request.QueryString["value"]; 
    }
}


Frontend:
acquire.aspx

<%@ Page Language="C#" AutoEventWireup="true" CodeFile="acquire.aspx.cs" Inherits="acquire" %>

<!DOCTYPE html PUBLIC "-//W3C//DTD XHTML 1.0 Transitional//EN" "https://www.w3.org/TR/xhtml1/DTD/xhtml1-transitional.dtd">

<html xmlns="https://www.w3.org/1999/xhtml">
<head runat="server">
<title></title>
</head>
<body>
<form id="form1" runat="server">
<div>
<asp:TextBox ID="TextBox1" runat="server"></asp:TextBox>
<asp:TextBox ID="TextBox2" runat="server"></asp:TextBox>
<asp:TextBox ID="TextBox3" runat="server"></asp:TextBox>
<asp:TextBox ID="TextBox4" runat="server"></asp:TextBox>
</div>
</form>
</body>
</html>


Arduino Sketch:

#include <SPI.h>
#include <Ethernet.h>

byte mac[] = {  
  0xDE, 0xAD, 0xBE, 0xEF, 0xFE, 0xED };
byte ip[] = { 
  192,168,2,20 };
byte server[] = { 
  46,16,168,17 }; 

Client client(server, 80);

void setup() { 
  Ethernet.begin(mac, ip); 
  Serial.begin(9600);
}

void loop()
{
  delay(1000);
  Serial.println("connecting...");
  client.connect();
  if (client.connected()) {
    Serial.println("connected");
    client.println("GET https://antrea.7hostfree.com/acquire.aspx?username=USERFROMARDUINO&password=PASSFROMARDUINO&datastream=DATASTREAMFROMARDUINO&value=VALUEFROMARDUINO HTTP/1.1");
    client.println ( "Host: https://antrea.7hostfree.com" ) ;  
    client.println();
  } 
  else {
    Serial.println("connection failed");
  }
  if (client.available()) {
    do {
      char c = client.read();
      Serial.print(c);
    }
    while (client.available());
  }
  if (!client.connected()) {
    Serial.println();
    Serial.println("disconnecting.");
    client.stop();
  }
}

Usare Pachube con più datastream

Oggi ho giocato un pò con il codice per inviare più dati su più datastream di pachube.
Per ogni datastream si possono mandare solo un dato alla volta: non si possono mandare contemporaneamente più dati da rappresentare su un solo grafo o più dati con un unica PUT.
Il modo più semplice per arginare tale problema è usare un algoritmo di scheduling Round Robin: inviare i dati a turno.

Esempio:
*stesso FEED

loop
PUT su DATASTREAM_1 del DATO_X
wait 12secondi
PUT su DATASTREAM_2 del DATO_Y
wait 12secondi

Il risultato è stato questo:

capturebez

Codice:

/*
  Pachube sensor client
 
 This sketch connects an analog sensor to Pachube (https://www.pachube.com) with one feed
 and two datastreams using a Wiznet Ethernet shield. You can use the Arduino Ethernet shield, or
 the Adafruit Ethernet shield, either one will work, as long as it's got
 a Wiznet Ethernet module on board.
 
 Circuit:
 * Analog sensors attached to analog in 2 and 3
 * Ethernet shield attached to pins 10, 11, 12, 13
 
 This code is in the public domain. 
 
 UPDATE:
 
 *Using Pachube's V2 API
 *Analog sensor attached to analog in 2 and 3 
 *New pachube.com IP
 *Using one feed and two datastreams: first for analog 2 and second for analog 3
 
 08/10/2011
 
 by Andrea Esposito
 www.blackstufflabs.com
 
 */

#include <SPI.h>
#include <Ethernet.h>

// assign a MAC address for the ethernet controller.
// fill in your address here:
byte mac[] = { 
  0xDE, 0xAD, 0xBE, 0xEF, 0xFE, 0xED};
// assign an IP address for the controller:
byte ip[] = { 
  192,168,1,20 };
byte gateway[] = {
  192,168,1,1};	
byte subnet[] = { 
  255, 255, 255, 0 };

//  The address of the server you want to connect to (pachube.com):
byte server[] = { 
  173,203,98,29 }; 

// initialize the library instance:
Client client(server, 80);

long lastConnectionTime = 0;        // last time you connected to the server, in milliseconds
boolean lastConnected = false;      // state of the connection last time through the main loop
const int postingInterval = 12000;  //delay between updates to Pachube.com
short flag=0;

void setup() {
  // start the ethernet connection and serial port:
  Ethernet.begin(mac, ip);
  Serial.begin(9600);
  // give the ethernet module time to boot up:
  delay(1000);
}

void loop() {

  //FEED number on your account settings
  //ex.: String FEED=37040;
  String FEED=YOUR_FEED_HERE;

  //ID_DATASTREAMS setted by you
  //ex.:String ID_STREAMING_1="1";
  String ID_STREAMING_1="YOUR_FIRST_ID_STREAM_HERE";
  String ID_STREAMING_2="YOUR_SECOND_ID_STREAM_HERE";

  // voltage=5v but on my board is 4.91v 
  float voltage=4.91; 

  // read the analog sensor:
  //LM35 on A2
  int sensorCelsius = analogRead(2); 
  sensorCelsius = (voltage * sensorCelsius * 100.0)/1024.0;

  //LM335 on A3
  int sensorKelvin = analogRead(3); 
  sensorKelvin = (voltage * sensorKelvin * 100.0)/1024.0;
  //sensorKelving-=273.15; //if you want it in C°

  // if there's incoming data from the net connection.
  // send it out the serial port. This is for debugging
  // purposes only:
  if (client.available()) {
    char c = client.read();
    Serial.print(c);
  }

  // if there's no net connection, but there was one last time
  // through the loop, then stop the client:
  if (!client.connected() && lastConnected) {
    Serial.println();
    Serial.println("disconnecting.");
    client.stop();
  }

  // if you're not connected, and ten seconds have passed since
  // your last connection, then connect again and send data: 
  if(!client.connected() && (millis() - lastConnectionTime > postingInterval)) 
  { //Round Robin
    if (flag==0) //sending data to first datastream
    {
      sendData(sensorCelsius, FEED, ID_STREAMING_1); 
      flag=1;
      Serial.print("ID_STREAMING_1 = ");
      Serial.println(ID_STREAMING_1);
    }
    else
    { //sending data to second datastream
      sendData(sensorKelvin, FEED, ID_STREAMING_2); 
      flag=0;
      Serial.print("ID_STREAMING_2 = ");
      Serial.println(ID_STREAMING_2);
    }
  }
  // store the state of the connection for next time through
  // the loop:
  lastConnected = client.connected();
}

// this method makes a HTTP connection to the server:
void sendData(int thisData , String myfeed , String myid) {

  //Your API_KEY on your account settings
  String API_KEY="YOUR_API_KEY_HERE"; 

  // if there's a successful connection:
  if (client.connect()) {
    Serial.print("Temperature: ");
    Serial.println(thisData);
    Serial.println("connecting...");

    // send the HTTP PUT request. 
    // fill in your feed address here:
    // PUT /v2/feeds/<feed_id>/datastreams/<datastream_id>
    String myput="PUT /v2/feeds/";
    myput+=myfeed;
    myput+="/datastreams/";
    myput+=myid;
    myput+=" HTTP/1.1n";
    Serial.println(myput);
    client.print(myput);

    client.print("Host: api.pachube.comn");
    // fill in your Pachube API key here:
    client.print("X-PachubeApiKey: ");
    client.print(API_KEY);
    client.print("n");
    client.print("Content-Length: ");

    // calculate the length of the sensor reading in bytes:
    int thisLength = getLength(thisData);
    client.println(thisLength, DEC);

    // last pieces of the HTTP PUT request:
    client.print("Content-Type: text/csvn");
    client.println("Connection: closen");

    // here's the actual content of the PUT request:
    client.println(thisData, DEC);

    // note the time that the connection was made:
    lastConnectionTime = millis();
  } 
  else {
    // if you couldn't make a connection:
    Serial.println("connection failed");
  }
}

// This method calculates the number of digits in the
// sensor reading.  Since each digit of the ASCII decimal
// representation is a byte, the number of digits equals
// the number of bytes:

int getLength(int someValue) {
  // there's at least one byte:
  int digits = 1;
  // continually divide the value by ten, 
  // adding one to the digit count for each
  // time you divide, until you're at 0:
  int dividend = someValue /10;
  while (dividend > 0) {
    dividend = dividend /10;
    digits++;
  }
  // return the number of digits:
  return digits;
}